
Multiplicative Thinking


Distributive Property: Arrays and the Area Model
The Distributive Property
Definition:
A number in a multiplication expression can be decomposed into two or more numbers. The distributive property can involve:
- multiplication over addition (e.g., 6 x 47 = (6 x 40) + (6 x 7))
- multiplication over subtraction (e.g. 4 x 98 = (4 x 100) – (4 x 2))
- division over addition (e.g. 72 / 6 = (60 / 6) + (12 / 6))
- division over subtraction (4700 / 4 = (4800 / 4) – (100 / 4))
- Distributive Law: “the multiplication operation may be applied to a number which has been partitioned without altering the outcome.” • 3 x 6 = 3 x (2 + 4) = (3 x 2) + (3 x 4) • 3 x (4 – 2) = (3 x 4) – (3 x 2)
- “Distributive Property” Video
Retrieved from: ARPDC: Multiplicative Vocabulary
When is this property introduced?
The foundations for this property are introduced when students explore the concept of conservation of number For example, no matter how you rearrange the number 24, you still have a value of 24: 12 + 12, 20 + 4, 21+3, 10 + 10 + 4
Students build upon that understanding when developing their understanding of multiplication. This property supports them when they are determining the answers to multiplication questions they are unable to recall. For example, if I don’t know 5 x 6 but I do know 5 x 5, I can use that to help me figure out 5 x 6. Rather than teaching a finger trick for multiplying by 9, students explore the connection to multiplying by 10.
The distributive property is used to explore single digit multiplication, multi-digit multiplication, binomial multiplication, etc.
How might this property be introduced?
Many models can be utilized to represent the use of the Distributive Property. Below, you will find the Distributive Property explored from Kindergarten to Grade 9 using the area model/arrays.
Exploring the Distributive Property throughout the grades:
The processes for implementing the Distributive Property are scripted. This is NOT to script you but to provide you with a possible process for implementation. Please adapt to your style and the needs of your students!
Kindergarten
CURRENT Curricular Outcomes:
Relate a numeral, 1 to 10, to its respective quantity
Represent and describe numbers 2 to 10, concretely and pictorially
Process of Complexity:
Spend a lot of time focusing on 2’s. Once students demonstrate understanding, move to 5’s. Repeat for 3’s and 4’s.
Handouts have been created with both Kindergarten and Grade 1 in mind. Ensure that you are using materials that match the Kindergarten outcomes.
Key Vocabulary:
The following key vocabulary should be used with and by students. Words in italics are not expected at this grade level. They are included here as a support for the teacher. Key Vocabulary will be italicized every time it is used below in order to draw attention to its introduction and use.
- covering
Optional vocabulary:
The following vocabulary occurs in subsequent grades but could be used at this level with direct teaching.
- area
- rectangle
- length
The Process:
Students will work with concrete manipulatives. Stick with the “squares of 2” for the activities listed below for a period of time to really build an understanding of 2. Each time you do the activity, you can switch out for different values. As students are ready, move on to 5’s, 3’s and 4’s.
Strategy Part 1: Concrete
> How many do you see?
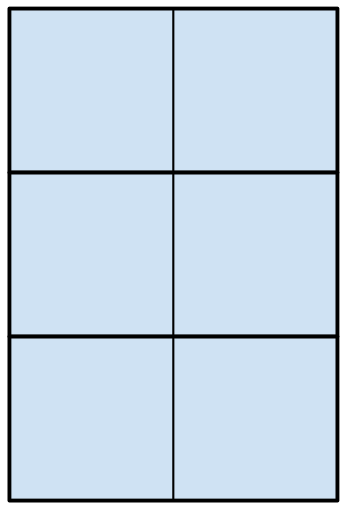
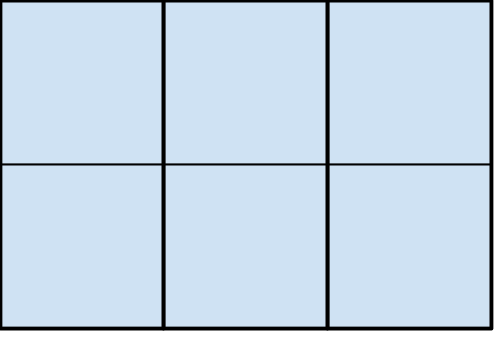
- Print the “Squares” handouts and cut along the bold lines.
- Give students 1 of the “Squares of 2” (shaded in grey with thick borders)
- Say, “Let’s count the little grey squares inside.” Point to the first square and say 1. Point to the second square and look to the student to respond with 2.
- Move this 2 in front of you.
- Place 3 more in front of the student.
- Say, “I wonder if all of these are 2. Check this one (point to one in front of the student”. If it’s a 2, push it into my pile and say 2. If it’s not a 2, push it over there and say not 2. (point off to the side).
- Students should push all rectangles towards you, saying 2.
> Organize them into an array.
- Place the pile in between you and say, “Let’s organize this neatly. Here’s a 2.”
- Place the 2 in front of the student.
- Move another 2 below that 2 so you now have a 2×2 array and say “2”.
- Have the student finish placing the rest so the array builds down. You’ll end up
with a 2×3 array, a 2×4 array, etc. Each time, the student should say 2. (not counting up: 2, 4, 6.) - Have students disassemble the array one 2 at a time by pulling a 2 away from the
array, saying 2 while they do it. - Have students recreate the array “the other way”: turn the 2 vertically and build the array like the following image. Repeat the previous steps of building it and then decomposing it.
- Repeat the process for building/disassembling both array orientations (vertical
and horizontal) but this time say, “one 2, two 2’s, three 2’s, four 2’s.”
Disassembling would be saying “four 2’s, three 2’s, one 2)
Strategy Part 2: Concrete
> How many are needed to build a bigger rectangle?
- Give students the shaded squares of 2 and the smallest rectangle (not shaded)
- Ask “How many of these do you need to cover this? Make a guess and then build to check.”
- Repeat for the other unshaded rectangles.
- Extension: You can also ask “How many grey squares is that?”
Grade 1
CURRENT Curricular Outcomes:
Say the number sequence 0 to 100 by
- 1s forward between any two given numbers
- 1s backward from 20 to 0
- 2s forward from 0 to 20
- 5s and 10s forward from 0 to 100
Represent and describe numbers to 20, concretely, pictorially and symbolically
Process of Complexity:
Spend a lot of time focusing on 2’s. Once students demonstrate understanding, move to 5’s. Repeat for 3’s and 4’s.
Handouts have been created with both Kindergarten and Grade 1 in mind. Ensure that you are using materials that match the Grade 1 outcomes.
Key Vocabulary:
The following key vocabulary should be used with and by students. Key Vocabulary will be italicized every time it is used below in order to draw attention to its introduction and use.
The Process:
Students will work with concrete manipulatives. Stick with the “squares of 2” for the activities listed below for a period of time to really build an understanding of 2. Each time you do the activity, you can switch out for different values. As students are ready, move on to 5’s, 3’s and 4’s.
Strategy Part 1: Concrete
> How many do you see?
- Print the “Squares” handouts and cut along the bold lines.
- Give students 1 of the “Squares of 2” (shaded in grey with thick borders)
- Say, “Let’s count the little grey squares inside.” Point to the first square and say 1. Point to the second square and look to the student to respond with 2.
- Move this 2 in front of you.
- Place 3 more in front of the student.
- Say, “I wonder if all of these are 2. Check this one (point to one in front of the student”. If it’s a 2, push it into my pile and say 2. If it’s not a 2, push it over there and say not 2. (point off to the side).
- Students should push all rectangles towards you, saying 2.
> Organize them into an array
- Place the pile in between you and say, “Let’s organize this neatly. Here’s a 2.”
- Place the 2 in front of the student.
- Move another 2 below that 2 so you now have a 2×2 array and say “2”.
- Have the student finish placing the rest so the array builds down. You’ll end up
with a 2×3 array, a 2×4 array, etc. Each time, the student should say 2. (not counting up.) See the image on the right. - Have students disassemble the array one 2 at a time by pulling a 2 away from the
array, saying 2 while they do it. - Have students recreate the array “the other way”: turn the 2 vertically and build the array like the second image on the right. Repeat the previous steps of building it and then decomposing it.
- Repeat the process for building/disassembling both array orientations (vertical
and horizontal) but this time say, “one 2, two 2’s, three 2’s, four 2’s.”
Disassembling would be saying “four 2’s, three 2’s, one 2”.
> Introduce skip counting
Repeat “Organize them into an array” but this time have students count how many grey squares there are. “One 2 is 2. Two 2’s is 4.” etc.
Strategy Part 2: Concrete
> How many are needed to cover a bigger rectangle?
- Give students the shaded squares of 2 and the smallest rectangle (not shaded)
- Ask “How many of these do you need to cover this? Make a guess and then build to check.”
- Repeat for the other unshaded rectangles.
- You can also ask “How many grey squares is that?”
Strategy Part 3: Abstract
> Look for patterns in skip counting
- After students have explored making arrays, have them skip count out a 2×4 array. “One 2 is 2. Two 2’s is 4. Three 2’s is 6. Four 2’s is 8.”
- Write out the statements (from previous bullet) vertically on the board
One 2 is 2
Two 2s is 4
Three 2s is 6
Four 2s is 8
- Ask students to look for patterns. “What do you notice?”
- The first word is a number.
- The first words increase by one.
- The second word is always 2.
- The last number goes up by 2.
- Ask, “What do you think the next sentence will be?”
- Five 2s is 10.
- Ask, “How can we check?” (Build it)
- Students can build.
- Together, figure out the statements up to 2×10.
- Ask students to look for patterns in 2, 4, 6, 8, 10, 12, 14, 16, 18, 20. Can they use the patterns they notice to predict the next numbers in the sequence. Students can extend the pattern as far as they are comfortable with.
Grade 2
CURRENT Curricular Outcomes:
Represent and describe numbers to 100, concretely, pictorially and symbolically.
Process of complexity:
Focus on building simple arrays in the beginning by choosing numbers that have a limited number of possible arrays. Ex. Begin with 6, 10, 12. When students are comfortable with these three arrays, introduce a prime number array (ie 5). Students can then move on to bigger numbers.
Key Vocabulary:
The following key vocabulary should be used with and by students. Key Vocabulary will be italicized every time it is used below in order to draw attention to its introduction and use.
- rectangle
The Process:
Students will work with concrete manipulatives to build arrays. Though the language will focus on additive thinking, arrays are the building blocks of multiplicative thinking.
Strategy Part 1: Concrete
> Build a rectangle (array)
- Provide students with square tiles or paper cut into squares. They will need enough to build whatever number you are currently working on.
- Say, “Use 6 tiles to build a rectangle.” (The only restriction is that the rectangle must be filled in. It won’t be possible to build a non-filled in rectangle with 6 tiles but later, it might be possible – so stress that you can’t leave holes in the middle even when that’s possible.)
- Give students time to build a rectangle.
- Have them show their rectangle to a partner. Did they build the same rectangle? Is there another rectangle they could build?
- Have a student describe the rectangle they built. Draw it on the board based on their description. Help them refine their explanation as needed.
- Ask if anyone else built the same rectangle.
- Who built it a different way?
- Repeat until all students have said their rectangle is built.
- If one or more rectangle are missing, (1×6, 6×1, 2×3, 3×2), say, “I wonder if there are more rectangle we haven’t yet found. Let’s see if we can find more. How will we know when we have found them all?”
- Give students time to find all of the rectangle and then represent them on the board.
- If a student asks “Is this a rectangle?” (most likely for the 1×6 and 6×1), ask them how they know if something is a rectangle.”
> Use addition/skip counting to count the array
- Focus on the rectangle that has 2 rows of 3.
- Point to the bottom row and say, “I see one 3.”
- Point to the top row and say, “and I see another 3.”
- Point to the bottom row and say, “one 3”
- Point to the top row and say, “two 3’s”
- Say, “The bottom row has 3” Write 3.
- Say, “The second row has 3 more.” Write +3.
- Say, “How many squares is that altogether?” (6)
- Write =6.
- Point to each part as you say, “3 plus 3 is 6”.
- Draw students’ attention to the rectangle that has 3 rows of 2.
- Ask, “How many is the bottom row made of?” (2).
- Point to the second row and ask, “How many is this row made of?” (2)
- Repeat for the top row.
- Say, “Let’s count the rows together. I have one 2” (point to the bottom row).
- Encourage students to say “two 2’s, three 2’s” with you.
- Point to the bottom row and say, “This row has 2.” Write 2 on the board.
- Point to the second row and ask, “How many does this row have?” (2).
- Say “So I have 2 and 2”. Write + 2.
- Point to the top row and as, “How many does this row have?” (2).
- Say “So I have 2 and 2 and 2.” Write +2 at the end.
- Point to each part as you ask, “If I have 2 plus 2 plus 2, how much is that altogether?” (6) Write = 6.
Look for relationships
- Focus students’ attention on both rectangles (2×3 and 3×2).
- Say, “Look at these two rectangle. What is the same? Similar? Different?”
- Give them a minute or so by themselves.
- Give them time to share with a partner.
- Discuss as a class.
- Students may respond with statements such as
- They both have 6 squares.
- They are both rectangle.
- They are the same rectangle but turned.
- One has 3 on the bottom and 2 on the side. The other has 2 on the bottom and 3 on the side.
- When I look at the 2×3 – can I see the 3’s? Can I see the 2’s?
- Explain that 2×3 and 3×2 are the same rectangle. From now on, they don’t have to build both. They just need to build one as long as they can see both.
> Repeat for the 1×6 and 6×1 array
- Students should explore the addition equations created using the 1×6 and 6×1 arrays.
- Students should look for relationships between the two arrays.
> Repeat for other arrays
- Students should build rectangle for other simple numbers such as 10 and 12.
- Students should build rectangle for prime numbers such as 5, 7, 13.
- When dealing with prime numbers, ask students why these numbers are special. (Because you can only build one rectangle. 1×5. They do not need to learn the term “prime number”. “Special” is just fine at this grade level.)
iGrade 3
Current Curricular Outcomes:
Represent and describe numbers to 1000, concretely, pictorially and symbolically.
Demonstrate an understanding of multiplication to 5×5 by
- Representing and explaining multiplication using equal grouping and arrays.
- Creating and solving problems in context that involve multiplication.
- Modeling multiplication using concrete and visual representations, and recording the process symbolically.
- Relating multiplication to repeated addition.
- Relating multiplication to division.
Demonstrate an understanding of division (limited to division related to multiplication facts up to 5×5) by
- Represent and explaining division using equal sharing and equal grouping
- Creating and solving problems in context that involve equal sharing and equal grouping
- Modeling equal sharing and equal grouping using concrete and visual representations, and recording the process symbolically
- Relating division to repeated subtraction
- Relating division to multiplication
Process of Complexity:
Focus on building simple arrays in the beginning by choosing numbers that have a limited number of possible arrays. Ex. Begin with 6, 10, 12. When students are comfortable with these three arrays, introduce a prime number array (ie 5). Students can then move on to bigger numbers. Focus on arrays created using 25 or less squares. This connects to the multiplication outcome and gives them more time to explore the smaller arrays.
Key Vocabulary:
The following key vocabulary should be used with and by students. Words in italics are not expected at this grade level. They are included here as a support for the teacher. Key Vocabulary will be italicized every time it is used below in order to draw attention to its introduction and use.
- Array
- Divide
- Division symbol
The Process:
Students will work with concrete manipulatives to build arrays. They will repeat the work done in grade 2 but make connections to multiplication.
This video was created in order to introduce this idea to students in a remote learning context.
Strategy Part 1: Concrete
> Build a rectangle (array)
- Provide students with square tiles or paper cut into squares. They will need enough to build whatever number you are currently working on.
- Say, “Use 6 tiles to build a rectangle.” (The only restriction is that the rectangle must be filled in. It won’t be possible to build a non-filled in rectangle with 6 tiles but later, it might be possible – so stress that you can’t leave holes in the middle when that’s possible.)
- Give students time to build a rectangle.
- Have them show their rectangle to a partner. Did they build the same rectangle? Is there another rectangle they could build?
- Have a student describe the rectangle they built. Draw it on the board based on their description. Help them refine their explanation as needed.
- Ask if anyone else built the same rectangle.
- Who built it a different way?
- Repeat until all students have said their rectangle is built.
- If one or more rectangles are missing, (1×6, 6×1, 2×3, 3×2), say, “I wonder if there are more rectangles we haven’t yet found. Let’s see if we can find more. How will we know when we have found them all?”
- Give students time to find all of the rectangles and then represent them on the board.
- If a student asks “Is this a rectangle?” (most likely for the 1×6 and 6×1), ask them how they know if something is a rectangle.”
> Make connections between using addition/skip counting and multiplication to count the array
- Focus on the rectangle that has 2 rows of 3.
- Point to the bottom row and say, “I see one 3.”
- Point to the top row and say, “and I see another 3.”
- Point to the bottom row and say, “one 3”
- Point to the top row and say, “two 3’s”
- Say, “The bottom row has 3” Write 3.
- Say, “The second row has 3 more.” Write +3.
- Say, “How many squares is that altogether?” (6)
- Write =6.
- Point to each part as you say, “3 plus 3 is 6”.
- Draw students’ attention to the rectangle that has 3 rows of 2.
- Ask, “How many is the bottom row made of?” (2).
- Point to the second row and ask, “How many is this row made of?” (2)
- Repeat for the top row.
- Say, “Let’s count the rows together. I have one 2” (point to the bottom row).
- Encourage students to say “two 2’s, three 2’s” with you.
- Point to the bottom row and say, “This row has 2.” Write 2 on the board.
- Point to the second row and ask, “How many does this row have?” (2).
- Say “So I have 2 and 2”. Write + 2.
- Point to the top row and as, “How many does this row have?” (2).
- Say “So I have 2 and 2 and 2.” Write +2 at the end.
- Point to each part as you ask, “If I have 2 plus 2 plus 2, how much is that altogether?” (6) Write = 6.
- Say, “We have built a rectangle using 6 squares. When you build a rectangle like this, we call it an array. Writing out 2+2+2=6 is fine. It gets us the right answer. Mathematicians, however, like to make writing more efficient. We know that this rectangle, this array, has three 2’s in it. A mathematician would write this: 3” (write 3) “rows of” (write x) “2”. (write 2).
- Point to each part as you say, “3 rows of 2 has a total of” (write =) “6” (write 6) “squares.”
- Say, “When a mathematician looks at 3×2, they might say 3 rows of 2. They might say three sets of 2’s. They might say three 2’s. All of these work.”
- Say, “We know that this array, this rectangle, also has 2 rows of 3. Help me figure out how to write 2 rows of 3.” (write 2 rows of 3).
- Ask a class, write 2×3 = 6 on the board.
Look for relationships
- Focus students’ attention on both equations (2×3=6 and 3×2=6).
- Say, “Look at these two equations. What is the same? Similar? Different?”
- Give them a minute or so by themselves.
- Give them time to share with a partner.
- Discuss as a class.
- Students may respond with statements such as
- They both equal 6.
- They both represent the same rectangle/array.
- One represents 3 rows of 2 while the other one represents 2 rows of 3.
- They both have 2, 3, 6 in the equation.
> Repeat for the 1×6 and 6×1 array
- Students should explore the equations created using the 1×6 and 6×1 arrays.
- Students should look for relationships between the two equations.
> Repeat for other arrays
- Students should build arrays and their equations for other simple numbers such as 10 and 12.
- Students should build arrays and their equations for prime numbers such as 5, 7, 13.
- When dealing with prime numbers, ask students why these numbers are special. (Because you can only build one rectangle. 1×5. They do not need to learn the term “prime number”. “Special” is just fine at this grade level.)
> Build the array based on clues.
- Say, “I have built a mystery array. I will give you one clue at a time. Use your tiles to build what you think the mystery array looks like.” Give students time to build an array after each clue. Remind students that their array might change as you give more clues and that’s ok. Clues should be visible to students after each one is revealed so they can refer back to previous clues.
- “Clue 1: I have 3 in each row.”
- “Clue 2: I have 4 rows.”
- “Clue 3: I have 12 squares altogether.”
- Create other mystery arrays. You can have students create their own mystery arrays to use with a partner.
> Build the connection to division
- Introduce a new mystery array:
- “Clue 1: I have 8 squares altogether.”
- “Clue 2: I have 2 rows.”
- “Clue 3: Each row has 4 squares altogether.”
- Ask, “What does the array look like? What do the equations look like?” (This is an excellent opportunity to write the equations as 8=2×4 and 8=4×2)
- This array introduces the concept of division.
- Say, “This one was trickier. Why?” (because you started with the total)
- Say, “I started with 8 squares. I divided those 8 squares into 2 rows. How did you figure out how many were in each row before I gave you the last clue? Talk to your partner.”
- Give students time to share in partners and then discuss as a class.
- Say, “A mathematician uses this symbol” (draw the ÷ symbol) “to say divide”. (write divides beside the symbol.) “This is a division symbol.” (notice you don’t say -the- division symbol. This is not the only division symbol)
- Say, “Let’s write out the equation. 8 squares” (write 8) “divided into” (write ÷) “2 rows” (write 2) “means that each row has a total of” (write =) “4 squares” (write 4)
- Point and say “8 divided by 2 is 4”.
- Say, “We have two multiplication equations to represent this array. 2×4 = 8 and 4×2 = 8. I wonder if there are two division equations. Talk to your partner. If you think there is another equation, what might it look like? If not, why not?” Give students time to talk. Discuss as a class. Write the equation 8 divided by 4 is 2.
- Say, “There are 2 division equations for this array. Do you think that’s true for other arrays? Would you say it’s always true, sometimes true or never true for all arrays?”
- Give students time to think, discuss with a partner and discuss as a class.
- Say, “From now on when we create an array, your job as a mathematician is to find both multiplication equations and both division equations.”
Strategy Part 2: Pictorial
>Visualize the arrays without drawing “inside” lines
- Say, “Picture a 3 x 2 array in your head. Can you see the 2’s? Look at the first 2. This time, imagine that the line showing the individual squares is gone. The size of the 2 hasn’t changed. You just don’t see individual 1’s anymore.”

- Say, “Now picture the 3’s. Imagine the line showing the individual squares is gone. The size of the 3 hasn’t changed. You just don’t see inidivdiual 1’s anymore.
- Display the following images:

- Ask, “When you look at this 2 x 3 array (above), what stands out for you? two 3’s or three 2’s? Why?” <Discuss>
- Draw the arrays below. Say, “Draw lines to make it easy to see sets of 3 in the array image.”

It should look as follows:

>Draw the arrays
- Explore the following 3 question formats with students. If needed, you can have them build it using the squares first and then draw pictures. Students should draw arrays (not groups of) to solve these questions. Then have students solve the equation and then write all 4 equations.
- Unknown Product: There are three rows of balls with 4 balls in each row. How many balls altogether?
- Group size unknown: You have 12 balls that are arranged into 3 equal rows. How many balls will be in each row?
- Number of Groups unknown: You have 12 balls arranged into equal rows of 3 balls. How many rows will there be?
Strategy Part 3: Symbolic
> Create equations
- Have students create the equation for an array of their choice and then create the other 3 equations that go with the array.
Grade 4
Current Curricular Outcomes:
Represent and describe numbers to 10 000, pictorially and symbolically.
Describe and apply mental mathematics strategies to determine basic multiplication facts to 9×9 and related division facts. Understand apply strategies for multiplication and related division facts to 9×9. Recall multiplication and related division facts to 7×7.
Demonstrate an understanding of multiplication (2- or 3-digit by 1-digit) to solve problems by
- Using personal strategies for multiplication with and without concrete materials
- Using arrays to represent multiplication
- Connecting concrete representations t symbolic representations
- Estimating products
- Applying the distributive property
Demonstrate an understanding of area of regular and irregular 2-D shapes by
- Recognizing that area is measured in square units
- Selecting and justifying referents for the units cm2 or m2
- Estimating area, using referents for cm2 or m2
- Determining and recording area (cm2 or m2)
- Constructing different rectangles for a given area (cm2 or m2) in order to demonstrate that many different rectangles may have the same area.
Strategy:
Whiteboard.chat file (Download this file and upload into your whiteboard.chat account.) https://drive.google.com/file/d/16GMivzW84ifDK2zIwbXzSTWyhP6y6Dme/view?usp=sharing
Process of Complexity:
If students have not worked through the array activities from grade 3, begin with those.
Students should have an opportunity to build familiar arrays as review. (See previous statement). Working with x5 arrays allow students to make new connections to x6 arrays.
Key Vocabulary:
The following key vocabulary should be used with and by students. Words in italics are not expected at this grade level. They are included here as a support for the teacher. Key Vocabulary will be italicized every time it is used below in order to draw attention to its introduction and use.
- Array
- Area
- Decompose
Strategy Part 1: Concrete
Whiteboard.chat file (Download this file and upload into your whiteboard.chat account.)
> Build an array
- Provide students with square tiles or paper cut into squares. The squares should look different on each side (ie. one side blue, one side white). They will need enough to build whatever number you are currently working on.
- Say, “Use the tiles to build a 3×5 array”
- Give students time to build the array.
- Say, “Use the other side of your squares to add on to this array to turn into a 3×6 array.
- Say, “We have a 3×5 array.”
- Ask, “How many square tiles did we use?” (15)
- Say, “We can describe this array as having an area of 15 square tiles”.
- Draw a box and write 3×5 inside of it. (This small box will create a visual of the array.)
- Say, “and”.
- Write + after the box.
- Say, “We have a 3 x 1 array.”
- Draw a box after the +.
- Write 3×1 inside of it.
- Ask, “How many tiles are in the 3×5 array?” (15)
- Write 15 below 3×5 and say, “The area of this array is 15 square tiles.”
- Ask, “How many tiles are in the 3×1 array?” (3)
- Write 3 below 3×1 and say, “The area of this array is 3 square tiles.”
- Say, “Altogether we have a 3×6 array. How many tiles are there altogether?” (15)
- Repeat for a 4×5 array, turning it into a 4×6 array.
- From now on, even when not indicated, reference the area of the array as: number of square tiles.
> Fold paper arrays
- Provide students with a paper 5×6 array.
- Say, I’d like to fold this array along a vertical line. What line should I fold it along?” You can point to several lines to give them an idea. (Student says to fold along the 2nd inside line – splits the 6 into 2 and 4).
- Fold the array to crease it. Unfold it. Use a marker to highlight that line so it stands out. Refold so they can see the 2×5.
- Ask, “What is this array?” (2×5) Write on the board. You can put it in a box or write as [2×5].
- Turn the paper so they see the 4×5 array.
- Ask, “What is this array?” (4×5). Write +[4×5]
- Ask, “How much is 2×5? (10) Write 10 below 2×5.
- Write +
- Ask, “How much is 4×5? (20) Write 20 below 4×5.
- Ask, “How much is that altogether? What is 5×6?” (30) Write =30
- Say, “I started with the array 5×6. When I look at 2×5 and 4×5, where did the 6 go?” (The six is split up into the 2 and 4.)
- Say, “Choose a different vertical line. Make the fold. Trace it. Find the arrays. Write them on the back.”
- Have students find all the vertical lines then they can move on to horizontal lines.
- Repeat this activity for numbers that include x8 and x9.
Strategy Part 2: Pictorial
> Draw the arrays
- Draw a rectangle. Label as 4×7.
- Say, “Drawing squares when building arrays is a lot of work. Look at this 4×5 array. Can you see 4’s? Can you see the 7’s?”
- Say, “Let’s split that 7 up to make 2 arrays.” Draw a vertical line.
- Ask, “How many do you think is on the left? (Someone says 2). Write 2.
- Ask, “If I split the array so that there is 2 on the left, how many are on the right?” (5)
- Point to the left side and ask, “What is this array?” (4×2) “How much is that?” (8) Write 8.
- Repeat for the right side.
- Ask, “How much is 4×7 altogether?” (28) Write.
- Repeat for arrays that focus on x6 and x7. Make sure to explore vertical and horizontal lines.
Strategy Part 3: Symbolic
> Create equations
- Write 5×7 on the board.
- Say, “I want to split this array into two arrays. Which number could I split? (either).
- Say, “For now, let’s split the 7. What might the two arrays look like?” (ex. 5×2 and 5×5.)
- When you look at your two arrays, can you see the 5’s? Can you see the 7’s?
- Say, “Look for other arrays.”
- Give students time to work.
- As students “finish”, ask, “How will you know when you have found them all?”
Strategy Part 4: Pictorial / Symbolic
> Connect to 2 digit x 1 digit Multiplication
- Draw a rectangle and label with 17 on the top and 5 on the side.
- Say, “17 is not an easy number to work with. How might I decompose the 17 into 2 numbers to make it easier to work with?”
- Students may give a variety of answers. Record them all on the board.
- Ask, “which one of these do you think might be the most helpful?” (10 + 7) “Why?” (Easy to figure out)
- Say, “We decomposed the number into 10 and 7 and wrote 10 then 7. Could we write it as 7 and 10? Why or why not?” Discuss.
- Say, “Both work! Does one way of writing it make more sense to you than the other? Why or why not?” Discuss.
- Say, “Though both ways are completely correct and get you the right answer, we typically write the 10 first. When we write the number 17, the value of the digit in the tens place is first so it makes the most sense to write that value first.)
- Solve.
- Draw another array beside this one but label with 5 on the top and 17 on the side. Repeat process, decomposing 17.
- What is the same about these two arrays? Different?
2 digit x 1 digit Strategy:
2 digit x 1 digit multiplication was introduced in Part 4 of the previous strategy. However, the process for introducing it using base ten blocks will also be shared. This strategy is not yet available in detailed form. However, you can use these videos and files in order to build your understanding of the strategy and move forward in your work.
You will need access to one of the following:
- Physical Base Ten Blocks (tens and ones) plus a piece of paper
- Printable Base Ten blocks (print in black and white OR color) plus a piece of paper
- Virtual Base Ten Blocks (CPM Tiles were used in the videos)
- Google Slide Deck
- Whiteboard.chat file (Download this file and upload into your whiteboard.chat account.)
Grade 5
Current Curricular Outcomes:
Represent and describe whole numbers to 1 000 000.
Apply mental mathematics strategies and number properties in order to understand and recall basic multiplication facts (multiplication tables) to 81 and related division facts.
Understand, recall and apply multiplication and related division facts to 9×9.
Demonstrate, with and without concrete materials, an understanding of multiplication (2-digit by 2-digit) to solve problems.
Strategy:
Whiteboard.chat file (Download this file and upload into your whiteboard.chat account.)
Process of Complexity:
If students have not worked through the array activities from grade 3 and/or 4, begin with those.
Begin by connecting x7 to x8, progressing from 2’s, 4’s, 6’s, 3’s, 5’s. Ie. 2×7==>2×8, 4×7==>4×8. When students demonstrate understanding, move to x9.
Key Vocabulary:
The following key vocabulary should be used with and by students. Words in italics are not expected at this grade level. They are included here as a support for the teacher. Key Vocabulary will be italicized every time it is used below in order to draw attention to its introduction and use.
- Array
- Decompose
The Process:
Strategy Part 1: Concrete
> Build an array
- Provide students with square tiles or paper cut into squares. The squares should look different on each side (ie. one side blue, one side white). They will need enough to build whatever number you are currently working on.
- Say, “Use the tiles to build a 2×7 array”
- Give students time to build the array.
- Say, “Use the other side of your squares to add on to this array to turn into a 2×8 array.
- Say, “We have a 2×7 array.”
- Draw a box and write 2×7 inside of it.
- Say, “and”.
- Write + after the box.
- Say, “We have a 2 x 1 array.”
- Draw a box after the +.
- Write 2×1 inside of it.
- Ask, “How many tiles are in the 2×7 array?” (14) Write 14 below 2×7.
- Ask, “How many tiles are in the 2×1 array?” (2) Write 2 below 2×1.
- Say, “Altogether we have a 2×8 array. How many tiles are there altogether?” (16)
- Repeat for a 2×9 array. You can connect it to 2×7 + 2×1 + 2×1 or 2×7 +2×2.
- Have students build a 4×6 array and turn it into a 4×8 array.
- Create the statements for it.
> Fold paper arrays
- Provide students with a paper 5×6 array.
- Say, I’d like to fold this array along a vertical line. What line should I fold it along?” You can point to several lines to give them an idea. (Student says to fold along the 2nd inside line – splits the 6 into 2 and 4).
- Fold the array to crease it. Unfold it. Use a marker to highlight that line so it stands out. Refold so they can see the 2×5.
- Ask, “What is this array?” (2×5) Write on the board. You can put it in a box or write as [2×5].
- Turn the paper so they see the 4×5 array.
- Ask, “What is this array?” (4×5). Write +[4×5]
- Ask, “How much is 2×5? (10) Write 10 below 2×5.
- Write +
- Ask, “How much is 4×5? (20) Write 20 below 4×5.
- Ask, “How much is that altogether? What is 5×6?” (30) Write =30
- Say, “I started with the array 5×6. When I look at 2×5 and 4×5, where did the 6 go?” (The six is split up into the 2 and 4.)
- Say, “Choose a different vertical line. Make the fold. Trace it. Find the arrays. Write them on the back.”
- Have students find all the vertical lines then they can move on to horizontal lines.
- Repeat this activity for numbers that include x8 and x9.
Strategy Part 2: Pictorial
> Draw the arrays
- Draw a rectangle. Label as 4×5.
- Say, “Drawing squares when building arrays is a lot of work. Look at this 4×5 array. Can you see 4’s? Can you see the 5’s?”
- Say, “Let’s split that 5 up to make 2 arrays.” Draw a vertical line.
- Ask, “How many do you think is on the left? (Someone says 2). Write 2.
- Ask, “If I split the array so that there is 2 on the left, how many are on the right?” (3)
- Point to the left side and ask, “What is this array?” (4×2) “How much is that?” (8) Write 8.
- Repeat for the right side.
- Ask, “How much is 4×5 altogether?” (20) Write.
- Repeat for arrays that focus on x8 and x9. Make sure to explore vertical and horizontal lines.
Strategy Part 3: Symbolic
> Create equations
- Write 7×8 on the board.
- Say, “I want to split this array into two arrays. Which number could I split? (either).
- Say, “For now, let’s split the 8. What might the two arrays look like?” (ex. 7×3 and 7×5.)
- When you look at your two arrays, can you see the 7’s? Can you see the 8’s?
- Say, “Look for other arrays.”
- Give students time to work.
- As students “finish”, ask, “How will you know when you have found them all?”
Strategy Part 4: Pictorial / Symbolic
> Connect to 2 digit x 2 digit Multiplication
- Draw a rectangle and label with 17 on the top and 8 on the side.
- Say, “17 is not an easy number to work with. How might I decompose the 17 into 2 numbers to make it easier to work with?”
- Students may give a variety of answers. Record them all on the board.
- Ask, “which one of these do you think might be the most helpful?” (10 + 7) “Why?” (Easy to figure out)
- Say, “We decomposed the number into 10 and 7 and wrote 10 then 7. Could we write it as 7 and 10? Why or why not?” Discuss.
- Say, “Both work! Does one way of writing it make more sense to you than the other? Why or why not?” Discuss.
- Say, “Though both ways are completely correct and get you the right answer, we typically write the 10 first. When we write the number 17, the value of the digit in the tens place is first so it makes the most sense to write that value first.)
- Solve.
- Draw another array beside this one but label with 7 on the top and 18 on the side. Repeat process, decomposing 18.
- Draw a third array but label with 17 on the top and 18 on the side. Ask, “How might we decompose this one?”
- Give students time to discuss ideas. Some may ask if they can decompose both numbers. Respond by saying something like, “That’s an interesting question. Why don’t you see what that might look like?”
- Ask for possible decompositions. Record on the board. Have a class discussion.
- Draw the decomposition of 17 into 7 and 10. Draw the decomposition of 18 into 8 and 10.
- Point to the 10×10 array and ask students to state the array and the value. Write 100 inside the array.
- Point to the 10×7 array and repeat.
- Point to the 8×10 array and repeat.
- Point to the 7×8 array and say, “I’m going to give you a minute or so to figure out the name of this array and its value.”
- After a minute, have students discuss with a partner then have a class discussion.
2 digit x 2 digit Strategy:
2 digit x 2 digit multiplication was introduced in Part 4 of the previous strategy. However, the process for introducing it using base ten blocks will also be shared. This strategy is not yet available in detailed form. However, you can use these videos and files in order to build your understanding of the strategy and move forward in your work.
You will need access to one of the following:
- Physical Base Ten Blocks (hundreds, tens and ones) plus a piece of paper
- Printable Base Ten blocks (print in black and white OR color) plus a piece of paper
- Virtual Base Ten Blocks (CPM Tiles were used in the videos)
- Google Slide Deck
- Whiteboard.chat file (Download this file and upload into your whiteboard.chat account.)
Grade 6
CURRENT Curricular Outcomes:
Demonstrate an understanding of factors and multiples by:
- determining multiples and factors of numbers less than 100
- identifying prime and composite numbers
- solving problems using multiples and factors
Strategy:
Whiteboard.chat file (Download this file and upload into your whiteboard.chat account.)
Process of Complexity:
Work with composite numbers with a small number of factors. When students demonstrate understanding, move on to prime numbers.
Key Vocabulary:
The following key vocabulary should be used with and by students. Words in italics are not expected at this grade level. They are included here as a support for the teacher. Key Vocabulary will be italicized every time it is used below in order to draw attention to its introduction and use.
- Dimensions
- Factors
- Prime Numbers
- Composite Numbers
The Process:
Strategy Part 1: Concrete/Pictorial
> Build an array
- Provide students with integer tiles or other small square tiles to work with (or use one of the electronic versions provided above).
- Say, “Build a rectangle using exactly 6 tiles.”
- Give students time to build a rectangle.
- Have a student share one rectangle.
- Ask, “Who else built the same rectangle?”
- Remind students that the orientation of the rectangle doesn’t matter. (3×2 vs 2×3) We only need to build one of those.
- As a class, determine the multiplication statements created with that rectangle (ie. 2×3=6, 3×2=6).
- Write out the side lengths of that rectangle. (2, 3)
- Repeat for the 1×6 rectangle.
- Repeat this process by building a rectangle using exactly 12 tiles. Then build a rectangle using exactly 15 tiles. If students prefer to draw the rectangles at this stage, that is fine.
- Write on the board/Display:
- 6 tiles: 1, 2, 3, 6
- 12 tiles: 1, 2, 3, 4, 6, 12
- 15 tiles: 1, 3, 5, 15
- Ask, “What do all of the numbers represent?” (side lengths, dimensions)
- Ask, “Why do they all have a 3?” (because you can build all of those rectangles with a side length/dimension of 3.)
- Ask, “Why does only one have a 5?” (Because only one of the rectangles can be build with a side length/dimension of 5.”
- Say, “We have been using the word side length or dimension. Mathematicians use the word factor. Mathematicians would say: 1, 2, 3, and 6 are factors of 6.”
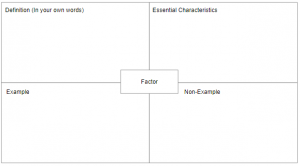
- Provide students with a Frayer Model to complete in groups.
- Ask, “Can you find a different number that has 3 as a factor? What are the other factors of that number?” Discuss.
- Ask, “Can you find a different number that has 5 as a factor? What are the other factors of that number?” Discuss.
- Ask, “Can you find a number that has exactly 4 factors?” Discuss. “5 factors?” Discuss.
- Say, “Using your tiles, prove or disprove that 8 is a factor of: Choice 1: 40 Choice 2: 34”. (Providing two choices gives students an opportunity to challenge themselves.)
- Ask, “Can you find a number that has only 2 factors?” Give time to work and then discuss.
- Say, “Mathematicans have a special name for numbers that only have 2 factors: prime Numbers. What do you notice about prime numbers?” (Always 1x#)
- Say, “They call numbers with more than two factors Composite numbers.”
- Ask, “What’s the same about a prime number and a composite number? What’s different?” Give students time to brainstorm – individually and then with a partner. Discuss as a class.
Strategy Part 2: Abstract
> Create a process
- Say, “You won’t always have tiles with you to determine the factors of a number. With a partner, create a process for finding all of the factors for a number. Start with a small number and then check your process against a larger number. You will share your process with the rest of the class. Be prepared to explain how you know you have found all of the possible factors.” Gives students time to brainstorm a process and then share.
Grade 7
CURRENT Curricular Outcomes:
Demonstrate an understanding of the addition, subtraction, multiplication and division of decimals to solve problems (for more than 1-digit divisors or 2-digit multipliers, the use of technology is expected.)
Process of Complexity:
Students make connections to their understanding of arrays and decimals. Students begin by multiplying whole numbers by half, then by 2, and other whole numbers. Once students are comfortable, they multiply decimals by decimals.
Key Vocabulary:
The following key vocabulary should be used with and by students. Words in italics are not expected at this grade level. They are included here as a support for the teacher. Key Vocabulary will be italicized every time it is used below in order to draw attention to its introduction and use.
- Arrays
- Commutative Property
- Distributive Property
The Process:
This process begins with pictorial as it builds upon all of the work students have completed previously. Activate prior understanding by exploring activities in previous grades, if needed.
Whiteboard.chat file (You must right click to download it and then upload into your whiteboard.chat account)
Strategy Part 1: Pictorial
Note: Though this strategy begins with the Pictorial, if students have not used base ten blocks to explore decimals, bring out base ten blocks to expore ones, tenths and hundredths.
> Connect to prior knowledge: Commutative Property
- Display the following image, asking students to name the array.
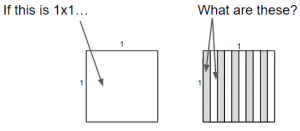
- Students may describe it as 1×2 or 2×1. Students need to recognize that both of those statements represent this array. If students need support in understanding this, write 2×1 on the board. Ask, “When you look at this can you see two 1’s?” (yes). Write 1×2 on the board. Ask, “When you look at this can you see one 2?” (yes). Remind students that some people will say it must be written as 2×1 and others will say that it must be written as 1×2. In fact, both are correct.
- Ask students, “If I rotate this image so it is vertical rather than horizontal, is it the same array or different? How would I name it?” It is the same array. Rotating it doesn’t change anything. All you have done is changed your perspective. This is the commutative property. The rotatated image can still be named as either 1×2 or 2×1.
- Display the following image, asking students to name the array. (3×1 or 1×3)

- Repeat the conversation above, if needed.
- Display and discuss the following 1×1 array.

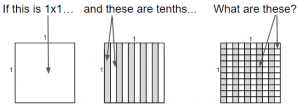
> Connect to prior knowledge: Decimals – ones, tenths and hundredths
- Display and discuss the following image. (tenths). The tenths are shaded as displayed to make it easier to distinguish.
- Display and discuss the following iamge. (hundredths).
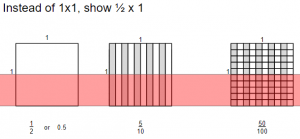
> Connect to prior knowledge: halves and the distributive property
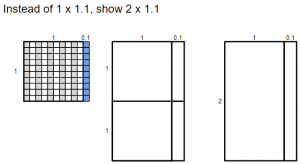
- Display the following image. Say, “I have 3 1×1 array as shown here. I want to turn these 1×1 arrays into 1/2 x 1 arrays. What might I do?”
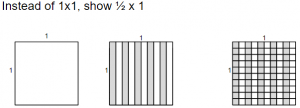
Give students some time to discuss. They should describe covering up half of each of the arrays. - Point to the first array and ask, what is the value of this array now? Students might say 1/2 or 0.5 Make sure to discuss both options as correct and write below the image. Point to the second array with tenths. Discuss. This could be named as 5/10 or 1/2 or 0.5. You only need to write 5/10 since you already have 1/2 and 0.5 written below the first one. Point to the third array and discuss. This array could be described as 50/100 or any of the previous answers. Write 50/100 below this image. Your image should now look like:
- Display the following image:
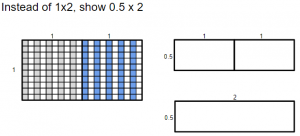
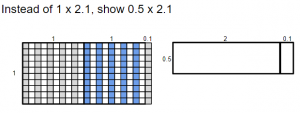
- Say, “We are going to explore a simple question that you probably already know the answer to. We begin with an easy one to make sure that the process you use is mathematically correct. Look at the image on the left and compare it to the image on the top right. What do you notice? What’s the same/different?” (The one on the right only shows half isntead of x1. The one on the right doesn’t have all of the individual hundredths showing.) Make sure students notice that when it was cut in half, it wasn’t about splitting the 1 and the 1. The line is drawn horizontally. This is because multiplication is about growing in two directions. If we turn a 1×1 array into a 1×2 array by growing to the right, then turning the 1×2 array into 0.5×2 means we have to make the change vertically.
- Point to the first 0.5×1 on the image in the top right. Say, “I have a 0.5 x 1 array. What is the value of that?” (0.5) Write 0.5 in the array.
- Point to the second 0.5×1 array and repeat.
- Ask, “How much is that altogether? What is 0.5 + 0.5?” (1)
- Below the image write 0.5 x 2 = 1. You could also write 2 x 0.5 = 1
- Point to the bottom right array. Ask, “How is this array similar to/different than the previous two arrays?”
- Ask, “What number would I write inside the 0.5×2 array? How do I know?” (two halves is 1)
- Say, “Draw an array to represent 3 x 0.5.” Give students time to draw the array and solve it. It doesn’t matter if they draw it to match the 0.5×2 array or if it is drawn vertically.
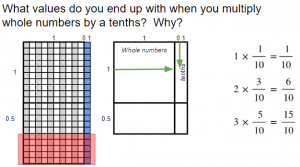
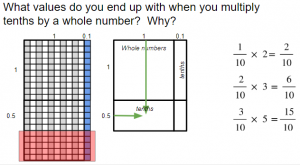
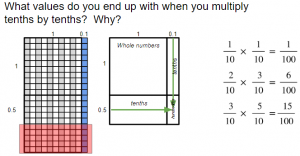
- Say, “Draw an array of any whole number x 0.5. Solve.”
- On the board, write the following equations and have students continue the pattern. Ask them to find and discuss any patterns they see. Discuss.
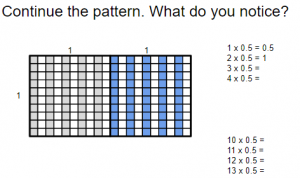
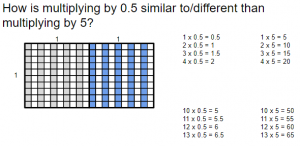
- Ask, “How is multiplying by 0.5 similar to/different than multiplying by 5?
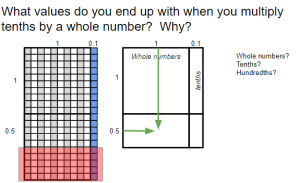
Strategy Part 2: Pictorial
> Multiplying half by another decimal
- Display the following image. Note that the tenth is blue. This is to help distinguish the tenth from the whole.
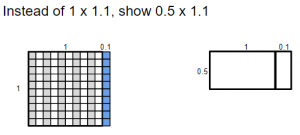
- Give students some time to explore on their own and with a partner before discussing how they solved this question. (Half of 1 is 0.5. Write 0.5 in the 0.5×1 array. Half of one tenth is 5 hundredths. Write 0.05 in the 0.5×0.1 array.)
- Display the following image.
- Give students time to figure this one out. (2 x 0.5 = 1, 0.5 x 0.1 = 0.05, 1 + 0.05 = 1.05)
- Say, “Draw an array to represent 2.2 x 0.5 and solve it.” Give students time to draw and solve. It doesn’t matter if they draw it vertically or horizontally.
- Say, “Draw an array of any decimal limited to tenths x 0.5. Solve.”
- Have students continue the pattern. What do you notice?
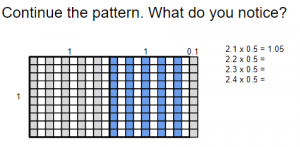
- Ask, “How are these patterns similar/different?”
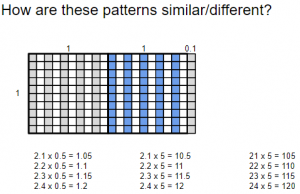
- Display and give students time to work through. Discuss answers and compare representations.
- Say, “Draw an array to represent 2 x 1.2 and solve.”
- Say, “Draw an array of any whole number x any decimal number limited to tenths. Solve.”
- Display the following image and have students discuss and explore how to solve it.
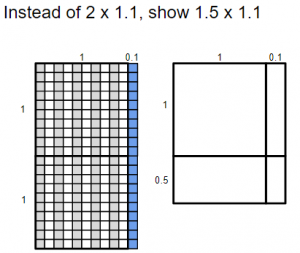
- Display the following image and have students solve it.
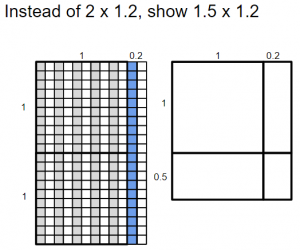
- Say, “Draw an array of any__.5 x any decimal number limited to tenths. Solve.” __.5 means any decimal number with 5 tenths. ie. 2.5, 3.5, 15.5, 103.5
- Display the following image and discuss. You don’t need the green arrows. You can just use your hands to draw their attention in a similar way. Just ensure you are starting at the 1’s and moving to the center.
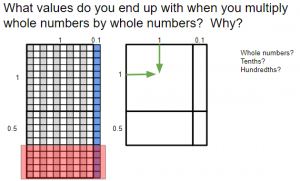
- Display the following image and discuss.
- Add the word tenths, work through the sample equations, and discuss.
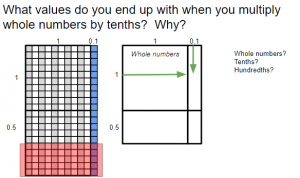
- Display the following image and discuss.
- Add the word tenths, work through the sample equations, and discuss.
- Display the following image and discuss.

- Add the word hundredths, work thorugh the sample equations, and discuss.
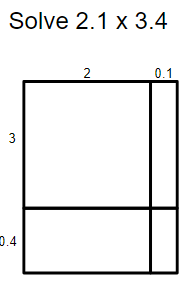
- Ask students to solve 2.1 x 3.4.
- Explore more questions.
- Say, “Let’s solve 2.1 x 3.4.” Give students a few minutes to solve it.
Say, “I’m going to walk through a different way to solve this. Ask I work through solving it, you will hear me talking my way through it. Afterwards, I will be asking you to share what’s similar to and different from the process we have been using.” Solve it using the process in the middle image. Discuss.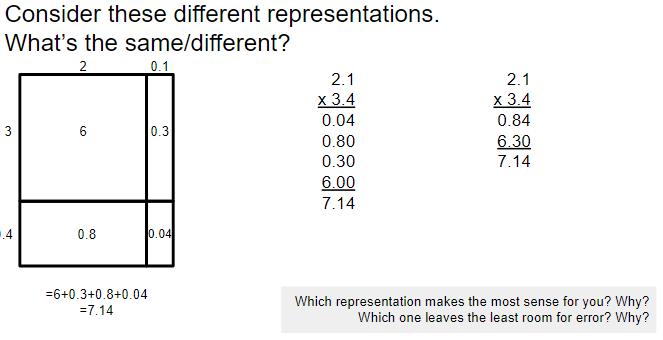
- Say, “Let’s explore another way to solve it. Again, listen as I solve it out loud for similarities and differences.” Solve it using the process in the image on the right. Discuss.
- Ask, “Which representation makes the most sense for you? Why?” Discuss.
- Ask, “Which one leaves the least room for error? Why?” Discuss.
- Say, “All 3 representations are correct processes for solving this question. It is up to you to decide which one you are most comfortable using and explaining.”
Grade 8
CURRENT Curricular Outcomes:
Demonstrate an understanding of multiplication and division of integers, concretely, pictorially and symbolically.
Process of Complexity:
Students will first connect to arrays they would have worked with in earlier grades. They will use this understanding to build an array that focuses on making one side of the array a subtraction statement. Then the other side. Finally, both sides.
Use this process before students are taught any rules or tricks to multiplying negative numbers.
Key Vocabulary:
The following key vocabulary should be used with and by students. Words in italics are not expected at this grade level. They are included here as a support for the teacher. Key Vocabulary will be italicized every time it is used below in order to draw attention to its introduction and use.
- Arrays
- Commutative Property
- Distributive Property
The Process:
This process begins with pictorial as it builds upon all of the work students have completed previously. Activate prior understanding by exploring activities in previous grades, if needed.
Strategy Part 1: Pictorial
> Connect to prior knowledge: Commutative Property
- Display a 2 x 3 array.
- Ask, “What is the multiplication statement for this array? (Students may say 2 x 3 or 3 x 2 – both are acceptable. There are two 3’s and three 2’s. The idea that they are the same is reinforced in the next question.)
- Display an image of the other option for a 2×3 array so students see both.

- Ask, “How are these two arrays the same? Different?” (Responses may include: both have: 6, sets of 2, sets of 3. The orientation is different.)
- Say, “If all you do is change your perspective – rotate your head or rotate the image – and the array looks the same, then the arrays are the same. This is why we can use an array to show the commutative property. 3 x 2 = 2 x 3”
> Connect to Prior Knowledge: Distributive Property Part 1
- Display the following image:
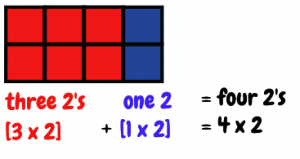
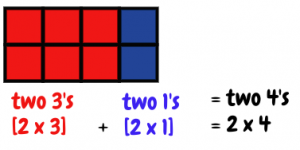
- Say, “We have our 3 x 2 array from before – can you see the three 2’s? We have added another 2 in blue. So now we have four 2’s. Three 2’s plus one 2 is four 2’s. 3 multiplied by 2 plus 1 multiplied by 2 is 4 multiplied by 2.
- Say, “We can look at this a different way, though it might be trickier to see it. When I look at one row I see a three and a one. When I look at it overall, I see two 3’s and two 1’s. Two 3’s and two 1’s is equal to two 4’s. 2 multiplied by 3 plus 2 multiplied by 1 is equal to 2 multiplied by 4.”
> Connect to Prior Knowledge: Distributive Property Part 2
- Draw the following image on the board:

- Say, “When you look at this, can you picture the 7 sets of 8? 8 sets of 7?”
- Say, “I can use an array to help me solve questions I don’t know. What if I don’t know the answer to 7 x 8? I can break the 8 up to make this easier to solve.”
- Modify the image to look like this:
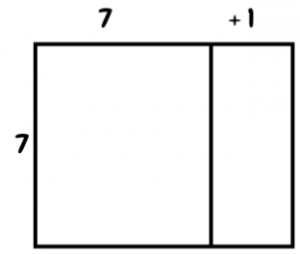
- Say, “Now I have have seven 7’s and 7 1’s. How much is seven 7’s? 7 x 7?” (49) Write 49 inside the first section.
- Say, How much is seven 1’s? 7 x 1? “(7) Write 7 inside the second section.
- Ask, “How much is that altogether?” (56) Write 56 on the outside and circle it.
- Say, “7 multiplied by 8 can be solved by figuring out 7 x 7 and 7 x 1.”
Strategy Part 2: Pictorial
> Use Distributive Property to determine that negative multiplied by a negative is a positive.
- Say, “We are going to explore the idea of multiplication of negative numbers. We are going to do that by exploring an array that everyone should already know the answer to. We do that to make the connections easier to see. We wouldn’t normally use this process to solve such an easy question.”
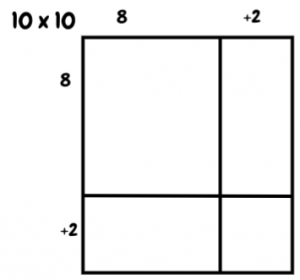
- Display a 10×10 array.
- Say, “When you look at this, imagine the ten 10’s horizontally – ten rows of 10. Imagine the ten 10’s vertically – ten columns of 10.”
- Say, “Let’s split this 10 x 10 array like this:
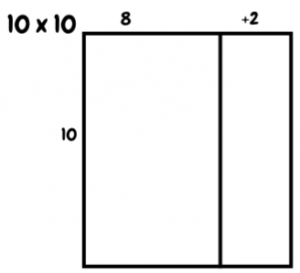
- Ask, “What values would we write in each section?” (80, 20)
- Write 80 + 20 = 100
- Draw a new 10 by 10 array beside the old one.
- Say, “I could have split the array this way…”
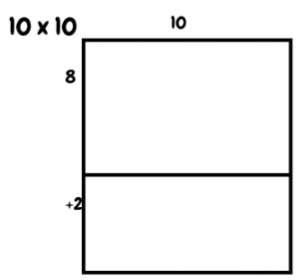
- “What values would this one have?” (80, 20)
- Write 80+20 = 100
- Say, “I could also draw it like this.”
- Ask, “What values would this one have?” (64, 16, 16, 4)
- Write 64 + 16 + 16 + 4 = 100
- Say, “So far, we have represented 10 by using 8 + 2. However, we could also represented 10 by using 12 and -2.”
- Draw the following array:
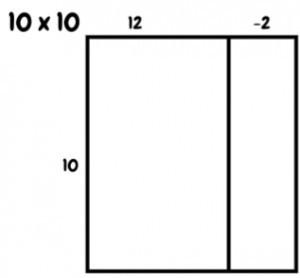
- Say, “I know that ten 12’s is 120. What is ten -2’s?” (-20)
- Say, “120 plus negative 20”
- Write 120 – 20 = 100.
- Draw the following array.
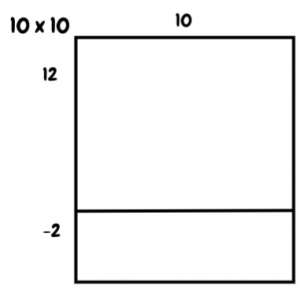
- Say, “What about this way? It’s easy to see that twelve 10’s is equal to 120 (write 120) but it might be hard to see negative two 10’s…but if I change my perspective and rotate the image or my head, I can use the commutative property to help see ten -2’s. How much is ten -2’s?” (-20). Write -20.
- Write 120 – 20 = 100.
- Say, “Let’s look at an interesting one.”
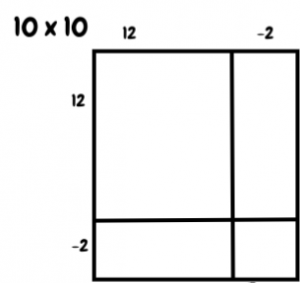
- Say, “This one is a puzzler. A puzzler is a bit more challenging and will make you think. You have 3 minutes to play with this one. You might not figure it out in the 3 minutes but that’s ok as long as you keep working on it. We will share our thinking at the end of the 3 minutes. You may have learned some tricks or rules to help you figure it out but I want you to stay away from using tricks and rules. You can use your trick or rule to help you see if you are right but see if you can figure it out with them.”
- After the 3 minutes, have a class discussion to determine how students figured out that -2 x -2 is = 4. Remember, just knowing/memorizing that a negative multiplied by a negative equals a positive is not the point of this. Students should be able to figure out that 12 x 12 = 144; 12 x -2 = -24, -2 x 12 = -24. 144-24-24 = 96. 96 + ___ = 100. Therefore -2 x -2 must equal 4.
- Ask, “I wonder if that is always true, regardless of the numbers? Let’s explore some other arrays where we already know the answer. You will choose to build this for a question you already know the answer to. For example, I know that 5 x 5 = 25 so I will build a (6-1)x (6-1) array. Notice that I made sure to use subtraction statements for both.”
- Give students time to create a simple array of their choosing, solve it and then discuss results as a class. Some students may ask if they have to match. Could I do (6-1) and (7-2)? Respond with, “That’s a great question. They both represent 5. Why don’t you try it and see what happens?” Other students may ask if the factors have to be the same. Would it work if I wanted to do 5 x 6? Could I do (6-1) x (7-1)? Or (6-1) x (8-2)?” Respond with, “That’s a great question. Why don’t you try it and see what happens.”
Grade 9
CURRENT Curricular Outcomes:
Determine the square root of positive rational numbers that are perfect squares
Model, record and explain the operations of multiplication and division of polynomial expressions (limited to polynomials of degree less than or equal to 2) by monomials, concretely, pictorially and symbolically.
Strategy:
The strategy is not yet available